Thursday, November 28, 2013

The Kids Table - Thanksgiving

The key to having a pleasant Thanksgiving meal......THE KIDS TABLE.....stock that baby up with tons of activities and crafts and maybe you will get a chance to exactly chew your food instead of inhaling it so you can grab little jimmy before he makes his grand Superman dive off you're Great Aunts Antique furniture.

Here are some of the crafts I did for my client's kid table.  They had five kids at their dinner and I wanted to make sure each one of them felt special and had fun.  I made these Turkey craft boxes as place cards, a way to keep them busy with crafts, and a place to put the crafts when they are done and take them home with them.  Here's how I did it.
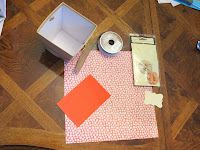
Materials 
The materials you will need need are:
1. Paper box....you can get these from dollar tree, Michaels, or hobby lobby really cheap.  I got these from Michaels for $2.99 each
2. Tags....you can either buy some premade tags at the craft stores or you can make your own.  I had some left over from another project so I used these.
3. Embellishments...it can be anything your creative mind can think of.  I'm using these paper flowers I got from Michales in the clearance section for $1.00
4. Scrapbook paper....I coordinated my paper with the paper flowers.  I tried to make sure each one was different for each child
5. Craft foam... I got mine at the dollar tree
6. Lastly, ribbon....I am using a burlap ribbon from Michaels.

Ok, let's get started.

First make a turkey head template
Trace and cut out on the craft foam


Next hot glue your ribbon around the sides
of your paper box
                   
                            Cover the overlap of ribbon with your
                  paper tag using your glue gun


Add your embellishment over top of
the tag to cover the glue marks
Fold your scrapbook paper accordion style
folding back and forth.  You can judge how
large you want the folds.

Fold in half 
Glue the two halves together

Once dry pull apart to make a fan
Turn it over and hot glue it to the back
of the paper box.  This creates the turkey feathers

Glue the turkey head that you cut
 out ahead of time to the inner part of
 the box in the front
You may need to hold it there for a little
until the glue has fully dried


Next cut out some feet
And glue them to the bottom of the
paper box so they show in the front

Print the kids names out on labels and stick them to the tags on the front of the box.  I later added a turkey face that I got off a google image search.  And you're done!  I hope you have a happy, healthy and safe Turkey Day!  Happy Crafting, Ciao for Now!
-Q-

Wednesday, November 27, 2013

A Southern Country Thanksgiving Table

I love the holidays, especially Thanksgiving
the food, the company, the beautiful tables.......

Here is my favorite one I did this year!!!!

My client asked me to help him out this year with his Thanksgiving table because he has an ULTRA busy schedule this time of year.  This man has "STYLE" so I jumped at the chance because I really wanted to try out something new for me.... a Southern Traditional Look!  


My client likes the traditional style in his home decor so it's only natural to want the same at your table but, I wanted to make sure I brought a little "Q" to the table by adding handmade items from my studio and little bits of bling!  Cause you know I gotta have my bling!  So first, my client selected a fabric that made me do a double take.  I was like, oh jeepers, how am I going to work with this....lol.  Definitely would not have been my first choice but the more I looked at it, the more I felt a connection with it. Sounds cheesy, but it's true.  The more I looked at the pattern the more I saw.  I made him a round tablecloth (well a table topper actually) out of the fabric.  My biggest challenge with that was the repeat on the fabric, 13" wide and long....lots of wasted fabric because I had to match the motif.  Since we only had 5 yards I had to be very careful with my cuts.  After I painstakingly racked my brain with geometry, and a phone call to my Mom (shout out alert), I figured it out.  The table cloth fit perfectly with the perfect amount of drop all around the table.  Go me, go me....

Earlier in the week I set up a few plate combination using dishes he already had. Like I said, he's got style so I had a few options to chose from.  He's also an even bigger dish lover than me.  I know, hard to believe right?  I like to mix up the plates/bowls to add a little extra visual texture as well as creating an opportunity to introduce more colors.  This was the plating option he liked best so we went with this.  I was thrilled he chose this one because I could add the yellow from the dinner plate to my floral arrangements. His dinner party was rather large so he mixed it up by using the other plate combinations on the second table which I think added more flavor.

The floral arrangements were inspired by the tablecloth.  As I said before, the more I looked at it the more I saw.  Kind of like when you look at the clouds in the sky, you "think" you see a bunny rabbit, or a train....Well believe it or not, I saw Pomegranates.....lol.  Pomegranates have amazing burgundy and rich red tones to them.  I used that to my advantage and paired that with deep red roses. I used white alstros with burgundy speckling and yellow alstros with burgundy speckling for highlights.  Lots of greenery for a grounding effect.  I also used bright red roses for depth.  I hand dipped some of the roses in gold paint because.....that's right, I gotta have my bling.  They came out perfect.  I will post a video on my YOUTUBE channel how to dip roses later this week.  Pomegranates also have a lot of visual texture in their core, so I cut them in half put them on skewers and stuck them into the arrangement.  For the base, my client had this pretty terracotta pot that I used on one table.  I decided to use the Soup Serving Dish on the other table that matched his dish set as the vase.  Hey, sometimes you have to think outside the box.  He was super happy with the way they came out and so was I.  What do you think?
\


My favorite part of the table were the handmade gold pumpkin place cards I made in my studio.  Because we were using a lot of reds and greens in the color scheme I didn't want it to look to much like Christmas, so miniature pumpkins were the ticket.  If you'd like to learn how to create these for your fall table, check out my blog archives for " Gilded Glam Pumpkin Place Cards  ".  I also have a video tutorial on YOUTUBE. http://www.youtube.com/watch?v=8j_kNRfvB3A   Check it out and subscribe. 

Well I hope this has inspired you to make your next dinner party the talk of the town.  Ciao of Now!
-Q-

Saturday, November 23, 2013

Navy and White Stripe Design

From Concept to Creation!

Who loves pinterest?  I do I do!.....Yes, Pinterest is brilliant, we all know that.  One of the things I love most is watching people repin my designs!  You like me, you really like me!!!!  Yeah that's right I get super excited to know you guys enjoy my work, makes me feel all warm and squishy.  

I get a lot of hits for this design on Pinterest.  So I thought I would talk a little about it for those who are interested.  
This area of the home is a split landing between floors.  Most people over look these spaces because you can't put a sofa there and sit down.  Well these are the spaces I enjoy designing the most.  They are a challenge for most and I love a good challenge.
BEFORE

AFTER
First I think most people are attracted to the navy and white striped walls.  Well good, I meant to do that.  I wanted a strong bold pop to make you notice the space.  When you first walk up the steps the walls are all done in the solid navy color (Classic Navy, by Weaverly) then you turn around and BAM in your face bold and beautiful stripes.   Now these stripes gave me a hard time.  Mainly because this was an old house....and I mean very old house....so the walls and ceiling were not straight.  To fix this problem I decided to create my own ceiling line using the navy paint.  I taped a straight line on the ceiling and brought the navy paint a little onto the ceiling up to my tape line.  This creates a new visual line and melts away the fact that the ceiling is dramatically off.  Then I proceeded with the alternating stripes.  They are about 10" wide each.  

I love the way Navy, Green, and Hot Pink go together.  It's fun, fresh and very fashion forward.  So I added the green chest of drawers (Malm, Ikea) to the space for a blast of color.  I added overlays (myoverlays.com) to the piece and choose the color from the painting on the right.  The painting introduced the pinks and orange color into the space while tying in the green.  The framed art below is a beautiful silk fabric I found and framed it.  It's an easy way to add more color to the space.  Try it!

I wanted to add a little bling to the space, a little decor jewelry if you will.  The light fixtures in the space was chosen because it added glam without adding another color.  The lamp I found in Home Goods for a steal!  The chandelier (pretty cool huh) was decided on first.  I love the way the crystals drop in a spiral shape.  They catch all the light from the window to the right!

Lastly, let's talk about that cute little vanity chair.  I found that at an antique market in NC.  My mom and I love browsing those places and you can find some AWESOME things there.  You just have to have an open mind.  So anyway, I rubbed the frame down with steel wool,  painted a new gold finish on the frame, hit it with a protective enamel, and recovered the seat in a fun stark white faux fur fabric and badabing, a brand new funky vanity chair.  I just love funky!!!!! 
Well that's it for this post!  If you have any questions, please don't hesitate to ask. 

 info@studioqdesigns.com. 

Thanks for reading, Ciao for now!
-Q-

Gilded Glam Pumpkin Place Cards for your Fall Table!

Tablescapes are a passion of mine.  I love a beautiful table and so do our guest.  My clients understand that, and really appreciate when I add special detailing and handmade items such as these GLAMOROUS pumpkin place cards.  I made these for a wonderful client in Washington DC.  Check out this tutorial and be sure to let me know how yours turns out!   
Q-TIP:  Get your mini pumpkins at your local nursery a few days before Thanksgiving.  They will usually have them on MEGA sale (if not free) by that time because they are trying to turn over their lot to get ready for Christmas Tree and Wreaths.  I got these at $0.25 per piece....CHA CHING!  

Start with a mini pumpkin, and spray paint it with a metallic spray paint.  You can use silver, gold, or any color you really like, but I find the metallic paints look the best.  I like to use Rustoleum brands but work with whatever is available to you.  http://www.rustoleum.com/product-catalog/consumer-brands/stops-rust/metallic/  Then find some greenery, either from your own yard or a small filler bouquet from your local grocery store.  I like to use greenery that has a berry like look to them for texture.  Try to use leaves with a smooth finish to them.  It's important that you choose greenery that is TOO SCALE with your pumpkins.


Once you have sprayed your pumpkins and pulled your greenery, then print out your guest names on clear/transparent labels.  Use a font that fits the theme of your table.  Cut around the names and stick them onto the leaves. 

Once you've finished that part, then it's time to glue.  Make sure your freshly sprayed pumpkins have been completely painted and dry for at least an hour.  Spray paint usually take only 15 mins to dry, but since we are using these around food I like to just play it safe.  First glue the greenery/berries to the steam and drape them down the side of the pumpkin.  I like to glue it down the sides so the greenery doesn't look like a stray piece of hair sticking out...lol.  Then add the leaf at the bottom of the steam covering the glue marks you previously made.  


After that, add a little piece of sparkle with a bead, pearl, rhinestone (whatever your creative mind can think of).  Placing it at the bottom of the leaf covering the previous glue marks. And easy peasy lemon squeezey, you're done!  A beautiful detail to add to your festive table!!!!  Happy Crafting!


Thanks for reading.  I also have the video tutorial on youtube for you visual learners. 

Ciao for Now!  Don't forget to follow me, I have a lot of craft projects in the works that I can't wait to share with all of you.