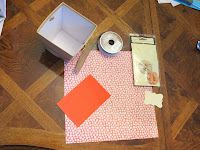
Here are some of the crafts I did for my client's kid table. They had five kids at their dinner and I wanted to make sure each one of them felt special and had fun. I made these Turkey craft boxes as place cards, a way to keep them busy with crafts, and a place to put the crafts when they are done and take them home with them. Here's how I did it.
 |
| Materials |
1. Paper box....you can get these from dollar tree, Michaels, or hobby lobby really cheap. I got these from Michaels for $2.99 each
2. Tags....you can either buy some premade tags at the craft stores or you can make your own. I had some left over from another project so I used these.
3. Embellishments...it can be anything your creative mind can think of. I'm using these paper flowers I got from Michales in the clearance section for $1.00
4. Scrapbook paper....I coordinated my paper with the paper flowers. I tried to make sure each one was different for each child
5. Craft foam... I got mine at the dollar tree
6. Lastly, ribbon....I am using a burlap ribbon from Michaels.
Ok, let's get started.
 |
| First make a turkey head template |
 |
| Trace and cut out on the craft foam |
 |
| Next hot glue your ribbon around the sides of your paper box |
 |
| Cover the overlap of ribbon with your paper tag using your glue gun |
 |
| Add your embellishment over top of the tag to cover the glue marks |
 |
| Fold your scrapbook paper accordion style folding back and forth. You can judge how large you want the folds. |
 |
| Fold in half |
 |
| Glue the two halves together |
 |
| Once dry pull apart to make a fan |
 |
| Turn it over and hot glue it to the back of the paper box. This creates the turkey feathers |
 |
| Glue the turkey head that you cut out ahead of time to the inner part of the box in the front |
 |
| You may need to hold it there for a little until the glue has fully dried |
 |
| Next cut out some feet |
 |
| And glue them to the bottom of the paper box so they show in the front |
Print the kids names out on labels and stick them to the tags on the front of the box. I later added a turkey face that I got off a google image search. And you're done! I hope you have a happy, healthy and safe Turkey Day! Happy Crafting, Ciao for Now!
-Q-


No comments:
Post a Comment
Please leave your comments below, I love hearing feedback.