Every year I get a little nuts around the Holidays and I go crafting crazy. Surprise Surprise right....
I just can't help myself. The stores are filled with holiday items that I swear I can make myself.
Well I was in Homegoods yesterday looking for some votive holders to place on my foyer table for an "Everyday is a Holiday" kind of look. I wanted something sort of traditional that I could use every year. After walking around the store saying over and over again "THEY WANT HOW MUCH FOR THAT!", I decided to make my own. Holiday decor can get expensive fast and if you're like me with a large Santa list, then you know how important it is to save money by doing some things yourself. Once I purchased the supplies, I was able to make several of these votives for the price of ONE in the store. SSSHHHH LISTEN, did you hear that? That was the sounds of money dropping in my piggy bank, CHA CHING!
Super simple an expensive project! Try it!
Things you'll need:
- Glass votive jar http://www.dollartree.com/household/home-decor/Candleholders/Rocks-Glass-Candle-Holders-4-inch/500c542c911p294384/index.pro?method=search
- Colored burlap similar to this one. http://www.walmart.com/ip/Design-It-SimpleStyle-FloraCraft-Burlap-Roll/23717565
- Lace ribbon http://www.walmart.com/ip/Berwick-Offray-Antiquity-White-Lace-Ribbon/22700348
- Thin Ribbon, Yarn, Hemp or Cording, you can find this in many craft places even the Dollar Tree.
- Small jingle bells. Look in Michaels or Hobby Lobby. Sorry I can't seem to find a direct link.
- Some sort of embellishment. A berry, miniature bow, rhinestone...whatever you want
- Hot glue gun
- 10 mins of your time
Ok, so let's get started.
 |
| 1. WRAP THE BURLAP AROUND THE GLASS JAR TO MEASURE THE LENGTH YOU NEED AND CUT IT |
 |
| 2. HOT GLUE ONE END TO THE GLASS JAR LEAVING EXTRA AT THE TOP |
 |
| 3. GLUE THE OTHER END OF THE BURLAP TO THE JAR OVERLAPPING THE OVER SIDE |
 |
| 4. MAKE SURE YOU LEAVE ENOUGH BURLAP AT THE TOP OF THE JAR FOR EFFECT. |
 |
| 5. TRIM THE TOP FINISHED EDGE OFF YOUR BURLAP |
 |
| 6. FRAY THE BURLAP BY PULLING ON THE TREADS AND UNRAVELING IT FROM THE TOP |
 |
| 7. IT SHOULD LOOK LIKE THIS WHEN DONE |
 |
| 8. WRAP YOUR LACE RIBBON AROUND THE BURLAP, MEASURE AND CUT |
 |
| 9. GLUE ONE EDGE OF THE RIBBON DOWN AT THE SAME SEAM AS THE BURLAP |
 |
| 10. WRAP THE RIBBON AROUND THE BURLAP IN THE CENTER AND GLUE DOWN OTHER EDGE OVERLAPPING THE FIRST EDGE |
 |
| 11. WRAP THE CORD AROUND THE GLASS LEAVING EXTRA TO TIE WITH, MEASURE AND CUT |
 |
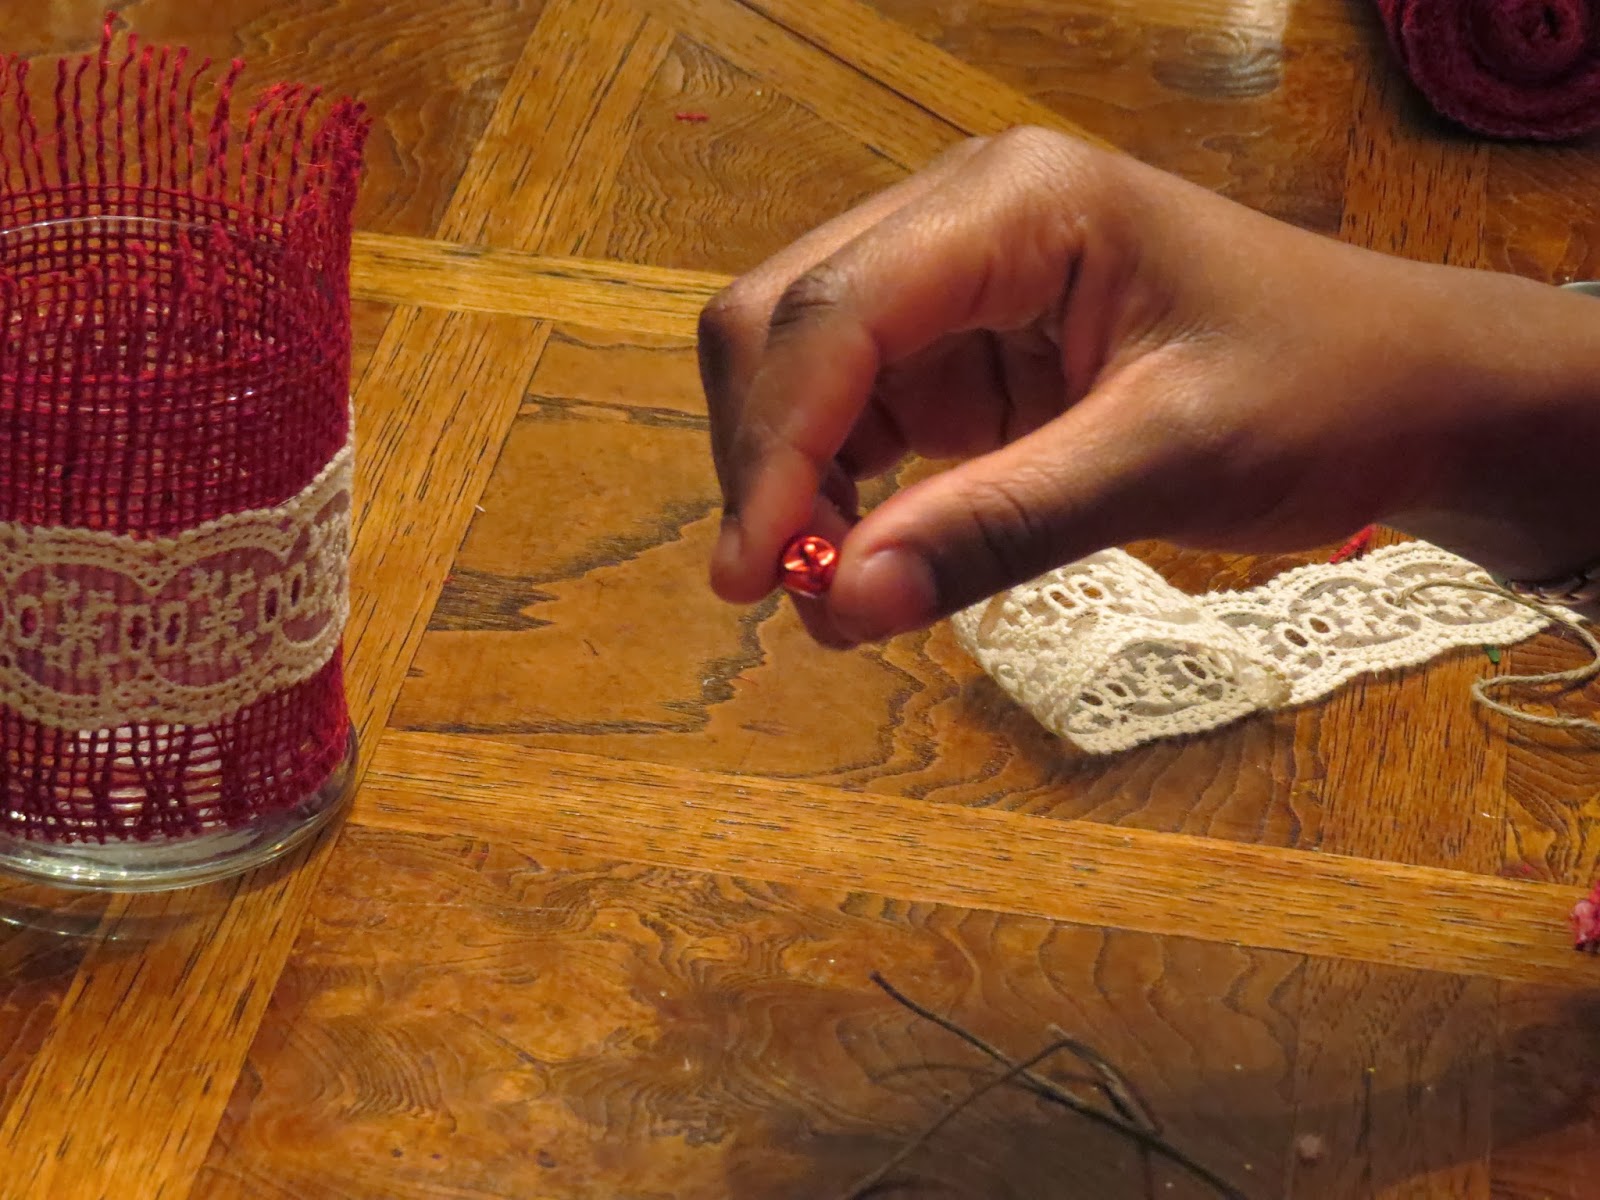
| 12. ADD SMALL JINGLE BELLS TO THE ENDS OF THE CORD WITH HOT GLUE |
 |
| 13. TIE CORD AROUND LACE IN THE MIDDLE MAKING A KNOT |
 |
| 14. GLUE DOWN THE KNOT SO NOTHING MOVES WHILE YOU WORK |
 |
| 15. MAKE A BOW OUT OF ANOTHER PIECE OF CORD |
 |
| 16. GLUE THE BOW ON WITH HOT GLUE AT THE POINT OF THE KNOT |
 |
| 17. THEN SNIP THE EXCESS OFF |
 |
LASTLY, ADD YOUR EMBELLISHMENT OVER THE BOW AND KNOT
YOU'RE DONE!
Thanks for reading and don't forget to subscribe and follow for more crafting and DIY tips. Happy Holidays and Happy Crafting. Ciao for Now!
-Q- |


No comments:
Post a Comment
Please leave your comments below, I love hearing feedback.